Light, sandy soils warm up faster than heavier, poorly drained soils. Of course, we don’t always have a choice, but if you are going to spend money on transplants and fertilizer, choose your best land for vegetables. The heat to warm up wet soil 1 degree will heat up dry soil 15 degrees.
Selection of Variety
Check the days to maturity. There is a big difference between many varieties, and this area needs careful consideration. The early variety may not be the best overall, but it can get you into the market earlier, which can be advantageous.
Use Windbreaks
This is perhaps the most important based on work I have done with melons. Windbreaks can decrease time to maturity by a week. Windbreaks are simply plantings with taller plants done weeks or months before your vegetable crop is planted. For example, a rye crop planting in October will be heading out when you plant melons April 1st. The melon crop is stripped into the standing rye.
Providing Frost Protection
In the past, I have worked with growers who went to the trouble and expense to bring in helicopters when an early morning freeze was predicted. It is not unusual to see vineyards with ‘wind machines’ to circulate air when a frost is predicted. Water sprinklers will coat plants with ice which is a freeze protection – sounds crazy I know! Some orchard owners will have bales of hay they set on fire to generate a smoke layer that holds in heat. The basic message is to be prepared if you plant early.
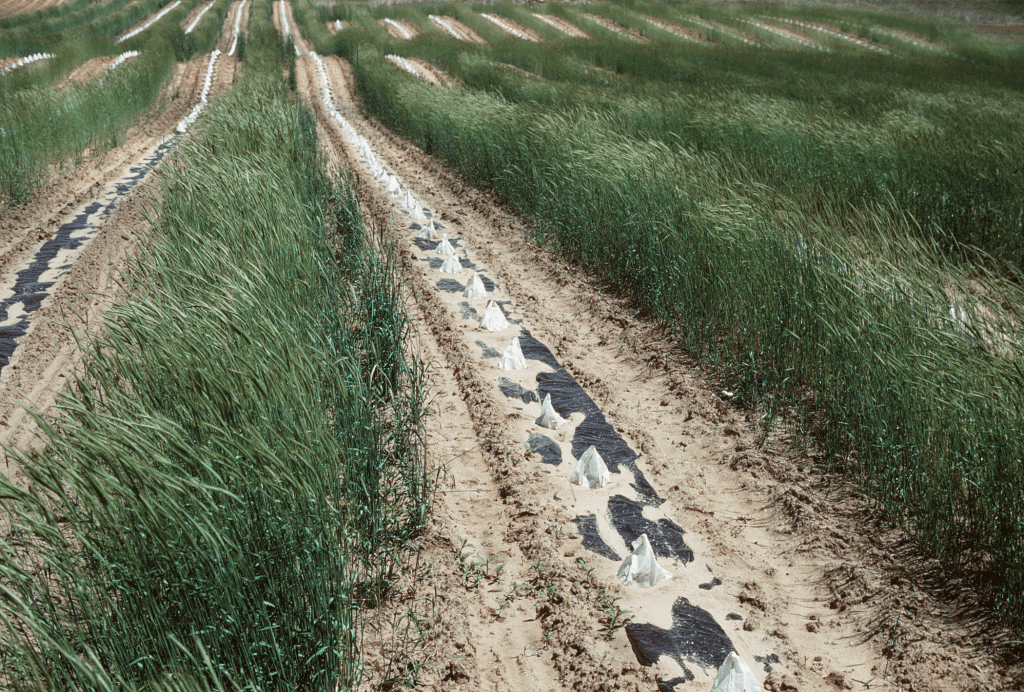
Use of Row Covers
High-value crops like strawberries really benefit from the use of row covers. These can be expensive, so the crop must generate good income to justify the cost. Floating row covers can protect plants from early-season pests and cold temperatures, allowing for earlier planting and faster growth (4 above). These covers can be removed once the danger of frost has passed or may be left on to protect from insect pests.
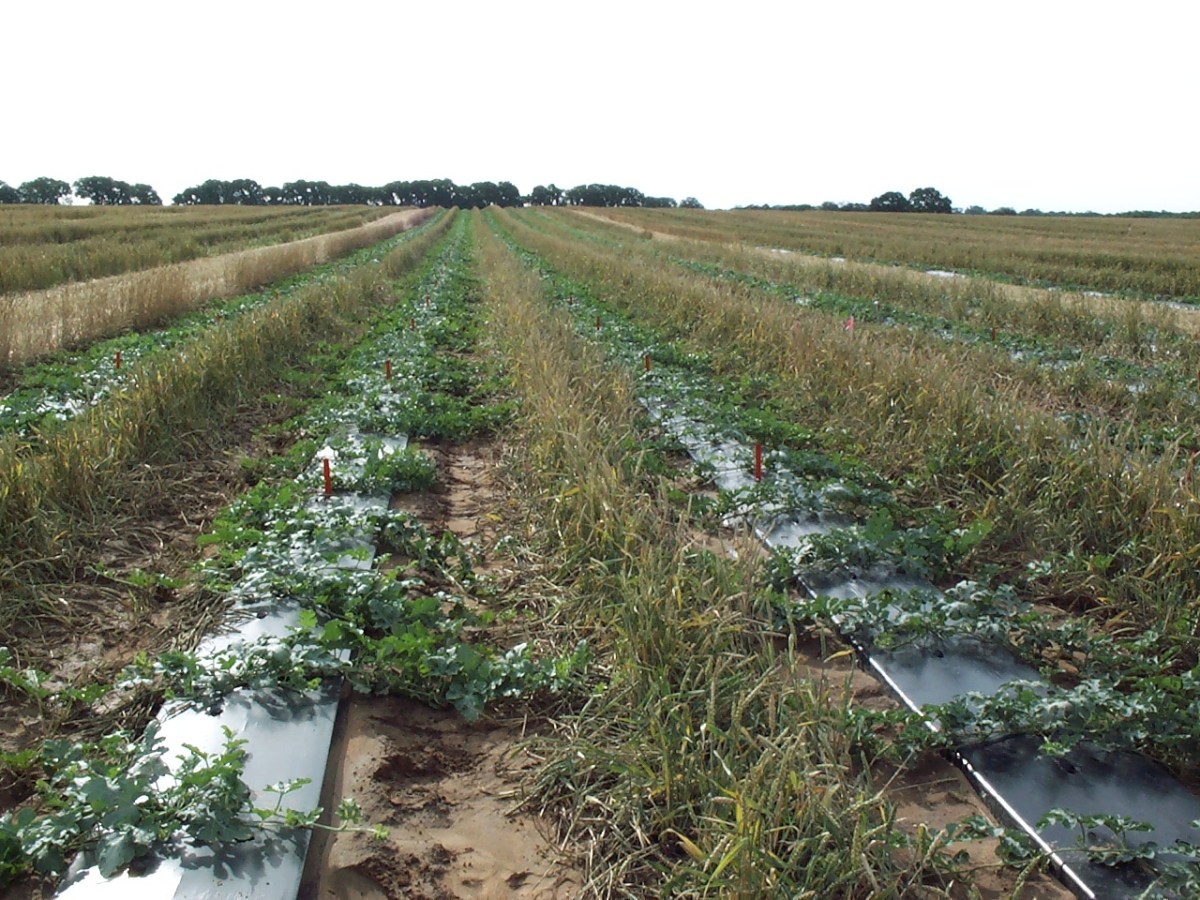
Plastic Mulch
These increase earliness by warming the soil, conserving moisture, preventing weed problems, and increasing total plant yields. In our Texas soils, plastic mulch can also help keep the plant row from becoming too wet or too dry.
Transplants
Transplants will greatly increase earliness but only if the transplant is healthy and vigorous. You must use organic sourced transplants! Currently we are working to develop better organic transplants and methods for growing transplants in a TDA supported Specialty Crop Grant. Some transplants that have been grown too long in the greenhouse don’t do well in the field so check your source constantly for when they will be ready so you will be ready.
Drip Irrigation
Providing water in small amounts often is the job of drip irrigation. Used with plastic mulch, drip irrigation increases earliness and yield. Drip irrigation is fairly easy to install and relatively inexpensive. You generally need a pressure regulator, filter, hoses or pipes to carry the water and drip tape to deliver to the crop.
Fertility
High levels of nutrients ensure rapid growth and utilization of water and sunlight. Many growers struggle to provide stored nutrients in soil, provide pop-up nutrients at planting, and fertilize with organic nitrogen sources through harvest. Regular soil testing helps determine nutrient deficiencies and allows for proper soil amendment before planting. Balanced soil fertility is crucial for early and vigorous plant growth.
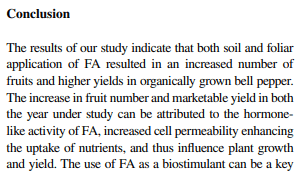
Effect of fulvic acid on yield performance of organic bell pepper (Capsicum annuum L.) under open‑field conditions in Tennessee. 2023
Certain growth-promoting substances, like seaweed extracts or microbial inoculants or even Fulvic Acid, can enhance earliness, plant growth and development, potentially leading to earlier harvests.
Staggered Planting
Planting in staggered intervals (planting tomatoes on a 2-week schedule) can help manage for frost losses and increase the harvest window and ensure a continuous supply of produce, allowing entry into the market over a longer period.
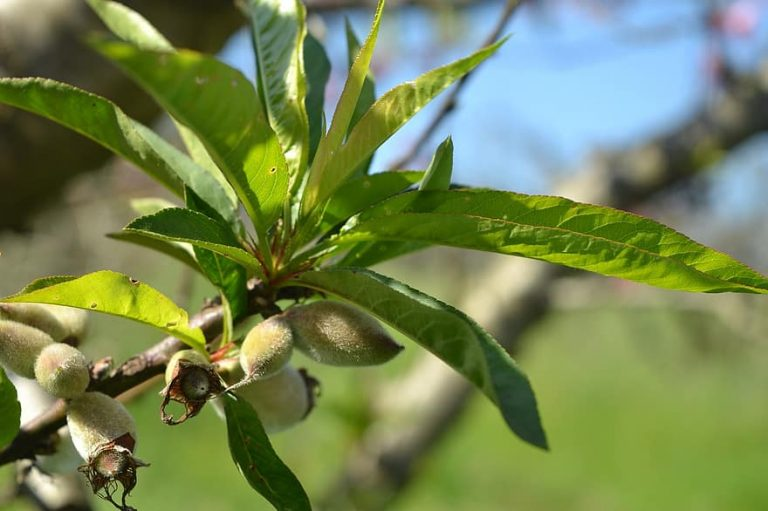
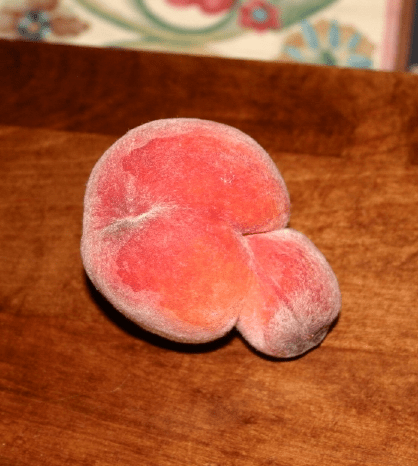
“Twinning” or “doubles” in peaches refers to the phenomenon where a single peach flower bud develops into two closely connected fruits. This occurrence is often related to the conditions experienced by the tree during the bud initiation phase of the previous year. I have been thinning my peach trees and I am seeing a large number of doubles and yet I still have plenty of fruit – so far! Several factors can contribute to the development of doubles in peach trees, with stress playing a significant role. Let’s explore these factors in more detail:
Temperature Fluctuations: Extreme temperature variations, especially during the critical period of bud differentiation, can cause abnormalities in the developing fruit. If cold temperatures follow a period of warm weather that initiated early bud development, the stress can lead to the formation of doubles.
Water Stress: Both excessive water and drought conditions can stress the tree and disrupt the normal development of fruit buds. Proper water management is crucial during the growing season to prevent such stress. I think this was a big part of the issue because we had very little rain and also hot temperatures last year.
Nutritional Stress: An imbalance in essential nutrients, particularly during the bud initiation and development stages, can lead to the formation of doubles. High nitrogen levels, for example, can promote excessive vegetative growth at the expense of normal fruit development, potentially causing abnormalities.
Genetic Factors: Some peach varieties are more prone to producing doubles than others. This genetic predisposition can be exacerbated by environmental stresses.
Pesticide or Herbicide Exposure: Certain chemicals, if applied improperly or at sensitive stages of development, can cause physiological stress to the trees, leading to abnormalities in fruit development. 2,4-D, a common lawn and pasture weed killer, can also act as a plant hormone and cause deformities.
Addressing these stress factors can help reduce the incidence of doubles in peach production. Careful management of orchard conditions, including temperature control where possible, appropriate watering, balanced nutrition, and cautious use of chemicals, can improve the overall health of the trees and reduce the occurrence of doubles. Selecting varieties less prone to this issue can also be a strategic decision for orchard management.
Larry Stein, Ph.D., AgriLife Extension horticulturist and professor in the Texas A&M College of Agriculture and Life SciencesDepartment of Horticultural Sciences and located at the Uvalde center is a very good friend and mentor. He spoke about both chill hours and peach doubles in a recent AgriLife News article. He said, “chill hours have been sufficient in the mid-to-low chill areas, but were marginal in the higher chill areas, with a lot of growers reporting “doubles” on plant blooms.”
“Doubles or multiple fruit come about as the result of stress during the flower initiation stage, which would have been May and June of 2023,” he said. “These doubles seem to be the consensus when talking to area producers, with some saying they are getting three and four fruit from a single bloom.”
According to Dr. Stein, irregular or inadequate watering has also been identified as a likely cause of fruit splitting and doubling.
“Consumers usually consider conjoined fruits less visually appealing,” Stein said. “For producers, sometimes the extra piece of fruit is so small as to be insignificant and can be safely removed without harming the main fruit. To avoid the conjoined fruit, producers typically thin their fruit trees to get as many double or multiple fruits back to singles as possible.”
Typical tree fruit load before thinning! We must thin to a fruit every 4-6 inches.It’s hard to remove fruit especially since we don’t know what the weather will bring!
Creating an adapted and sustainable organic farming system requires a comprehensive approach that encompasses both the selection and maintenance of crop varieties and an understanding of their interaction with the local environment and soil microbiome. This post aims to guide organic growers in developing a resilient agricultural practice by focusing on crop variety adaptation, seed saving, and leveraging the soil microbiome. In the realm of organic agriculture, the selection of seeds is a critical decision that influences not only the immediate productivity and health of the farm but also its long-term sustainability and economic viability. But before we dive into selecting seeds let’s talk about the organic standard for plantings seeds.
205.204 Seeds and planting stock practice standard – Organic Rules
(a) The producer must use organically grown seeds, annual seedlings, and planting stock: Except, That,
(1) Nonorganically produced, untreated seeds and planting stock may be used to produce an organic crop when an equivalent organically produced variety is not commercially available: Except, That, organically produced seed must be used for the production of edible sprouts;
(2) Nonorganically produced seeds and planting stock that have been treated with a substance included on the National List of synthetic substances allowed for use in organic crop production may be used to produce an organic crop when an equivalent organically produced or untreated variety is not commercially available;
(3) Nonorganically produced annual seedlings may be used to produce an organic crop when a temporary variance has been granted in accordance with § 205.290(a)(2);
(4) Nonorganically produced planting stock to be used to produce a perennial crop may be sold, labeled, or represented as organically produced only after the planting stock has been maintained under a system of organic management for a period of no less than 1 year; and
(5) Seeds, annual seedlings, and planting stock treated with prohibited substances may be used to produce an organic crop when the application of the materials is a requirement of Federal or State phytosanitary regulations.
Boiled down these rules mean you need to use only organically sourced seeds if at all possible. If there are not organic seeds available for the crop you want to plant or the organic varieties available are not adapted to your area, then you can select nonorganically produced seed varieties provided they are not treated of if they are treated the seed treatment is on the list of approved organic substances.
If you meet all the rules, then organic farmers are faced with the choice between 1. hybrid seeds, which dominate much of conventional and organic farming due to their high yield and disease resistance, 2. open-source seeds, which are freely available for use without intellectual property restrictions, and 3. traditional on-farm seed saving practices.
Hybrid seeds
Hybrid seeds created through the crossbreeding of two different parent plants, offer consistency and performance but require farmers to purchase new seeds each season, leading to increased costs and dependency on seed producers. A farmer must purchase hybrid seeds each season because the unique characteristics of first-generation (F1) hybrids—such as improved yield, disease resistance, and uniformity—do not reliably pass on to the next generation. This means seeds saved from hybrid crops typically result in plants that vary widely in their traits, losing the specific advantages that hybrids are valued for. Thus, to maintain consistency and performance in their crops, farmers need to buy new hybrid seeds each year. There are tremendous benefits to buying hybrids each year not the least of which is the almost guaranteed consistency of germination, overall plant health and yield. But what about these other methods for buying planting seed?
Open-source seeds
Open-sourced seeds on the other hand, are part of a movement aimed at ensuring seeds remain a shared resource. These seeds can be saved, replanted, and shared by anyone, promoting agricultural diversity and resilience. This system stands in stark contrast to the patented seeds of the large GMO seed industry, providing an alternative that supports the principles of organic farming by enhancing biodiversity and reducing farmers’ reliance on purchased seeds. However, despite the potential benefits, the majority of organic farming still relies heavily on hybrid seeds due to their immediate productivity benefits.
Open-source seeds emerge from a collaborative, transparent process aimed at keeping seeds as a shared resource accessible to all, without the encumbrance of patents or restrictive intellectual property rights. This model allows for the free exchange, use, and modification of plant genetic materials, encouraging innovation and adaptation in agriculture. Here’s a closer look at how open-source seeds are developed and maintained:
Development Process
Breeding and Selection: The initial development of open-source seeds involves traditional breeding techniques where plants are selected based on desired traits such as resilience to pests or diseases, adaptability to local climate conditions, nutritional value, or yield. This process can be undertaken by individual farmers, researchers, or through collaborative efforts among a community of breeders and farmers.
Open-Source Pledge: Once a new variety is developed, it can be pledged as open-source. This means the breeder commits to making the genetic resources of that variety freely available under an agreement that prohibits patenting or applying any other form of intellectual property restriction that would limit its use or redistribution. The Open Source Seed Initiative (OSSI) https://osseeds.org/ is one of the organizations that facilitate this pledge, ensuring the seeds remain free for anyone to use, breed, and share.
Maintenance and Distribution
Seed Companies: While open-source seeds are free from intellectual property restrictions, they still require meticulous cultivation to maintain their genetic purity and desirable traits. Specialized seed companies and cooperatives play a crucial role in this, producing these seeds under controlled conditions to prevent cross-pollination with other varieties, ensuring the seeds remain “true to type” from one generation to the next.
Cleaning and Quality Control: These companies also undertake rigorous cleaning processes to remove weed seeds and other contaminants, ensuring that the seeds are of high quality and ready for planting. This includes both physical cleaning methods and sometimes treatments to enhance seed viability and health without altering their genetic makeup.
Community Engagement and Support: Beyond production, the distribution of open-source seeds often involves educational efforts to inform farmers about the benefits and practices of using and saving these seeds. This includes training on how to save seeds and select for desirable traits, thus empowering farmers to become active participants in the cultivation and improvement of open-source varieties.
Open-source seeds represent a collective effort to promote biodiversity, resilience, and sustainability in agriculture. Through the dedicated work of breeders, seed companies, and the broader farming community, these seeds are developed, maintained, and distributed with the goal of keeping plant genetic resources accessible and adaptable to the changing needs of farmers and ecosystems around the world. This approach not only supports ecological and economic sustainability but also fosters a sense of community and cooperation in the agricultural sector. For more information check out the Organic Seed Alliance.
The Practice of Seed Saving
The practice of seed saving, a cornerstone of traditional agriculture, allows farmers to select seeds from plants that have thrived in their specific growing conditions, leading to a gradual improvement of crop genetics tailored to local ecosystems. This practice supports biodiversity and ecological balance, key components of organic farming. If you have any interest at all in seed saving to have plants adapted to your own farm you will enjoy this little discussion about these benefits. Just click: Growing for Flavor and Health – April 2024, Acres U.S.A.
Saving seed on the farm indeed encapsulates a blend of potential benefits and challenges that require careful consideration. Let’s explore these aspects in detail:
Benefits
Cost Savings: One of the most immediate benefits of saving seeds is the reduction in costs associated with purchasing new seeds each season. This can be particularly advantageous for small-scale and resource-limited farmers.
Adaptation to Local Conditions: Over time, seeds saved from plants that thrive in the local environment can lead to the development of plant varieties that are better adapted to local conditions, including climate, soil, and pests.
Preservation of Genetic Diversity: Saving seeds from a variety of plants helps to maintain and even increase genetic diversity within crop populations. This diversity can be crucial for resilience to disease and changing environmental conditions.
Challenges
Germination Issues: One challenge with saved seeds is the potential for lower germination rates. Factors such as improper storage conditions, age of the seed, or damage during processing can affect viability. It requires meticulous management to maintain high germination rates from season to season.
Seed Cleaning Problems: Proper seed cleaning is crucial to remove debris, weed seeds, and diseased seeds, which can be labor-intensive and requires specific equipment. Without effective cleaning, the quality of saved seeds can be compromised, leading to reduced crop quality and yield.
Genetic Drift and Diversity: While genetic diversity is a benefit, managing it can also be a challenge. Without careful selection, genetic drift can occur over time, potentially leading to the loss of desired traits. Moreover, in the case of open-pollinated and especially cross-pollinated crops, there is the risk of unwanted crossbreeding, which can result in off-type plants that do not have the desired characteristics of the original variety.
Navigating the Challenges
To address these challenges, farmers engaged in seed saving can adopt several strategies:
Education and Training: Learning about best practices in seed selection, harvesting, cleaning, and storage can improve the quality and viability of saved seeds.
Investment in Equipment: While initial investments may be required for cleaning and storage equipment, these can pay off in the long term through improved seed quality and crop yields.
Community Networks: Participating in local or online farming communities can provide valuable support and knowledge sharing around seed-saving practices. Sharing seeds and experiences can help in managing genetic diversity and solving common problems.
Selective Breeding: Careful selection of plants for seed saving can help maintain or enhance desired traits, ensuring the continuity and improvement of crop varieties over time.
The interplay between these seed systems—hybrid, open-source, and saved seeds—presents organic farmers with a complex set of choices, each with its own set of benefits and challenges. Understanding these options is crucial for anyone looking to support sustainable, productive, and resilient organic farming operations.
The Importance of Crop Variety Selection in Organic Systems
Choosing crop varieties suited to organic systems is important and too little emphasis is placed on this today. These varieties need to be resilient—capable of withstanding pests and diseases without synthetic chemicals, adaptable to local environmental conditions, and efficient in their use of nutrients from organic inputs. Moreover, their ability to outcompete weeds and their synergy with organic crop rotations make them an important part of your organic program. Key traits for organic varieties include:
Disease and Pest Resistance: Natural resistance reduces the need for interventions.
Adaptability to Local Conditions: Varieties should thrive under local climate and soil conditions.
Competitiveness with Weeds: Rapid growth and canopy development can help suppress weeds.
Nutrient Use Efficiency: Varieties should efficiently utilize nutrients from organic matter.
Quality and Market Preference: High-quality crops meet consumer and market demands.
Synergy with Organic Crop Rotations: Varieties should complement organic rotations to enhance soil health and manage pests.
The only way to evaluate, know and understand these traits are acting in your area or on your farm is to talk to other organic growers and to experiment on your own farm.
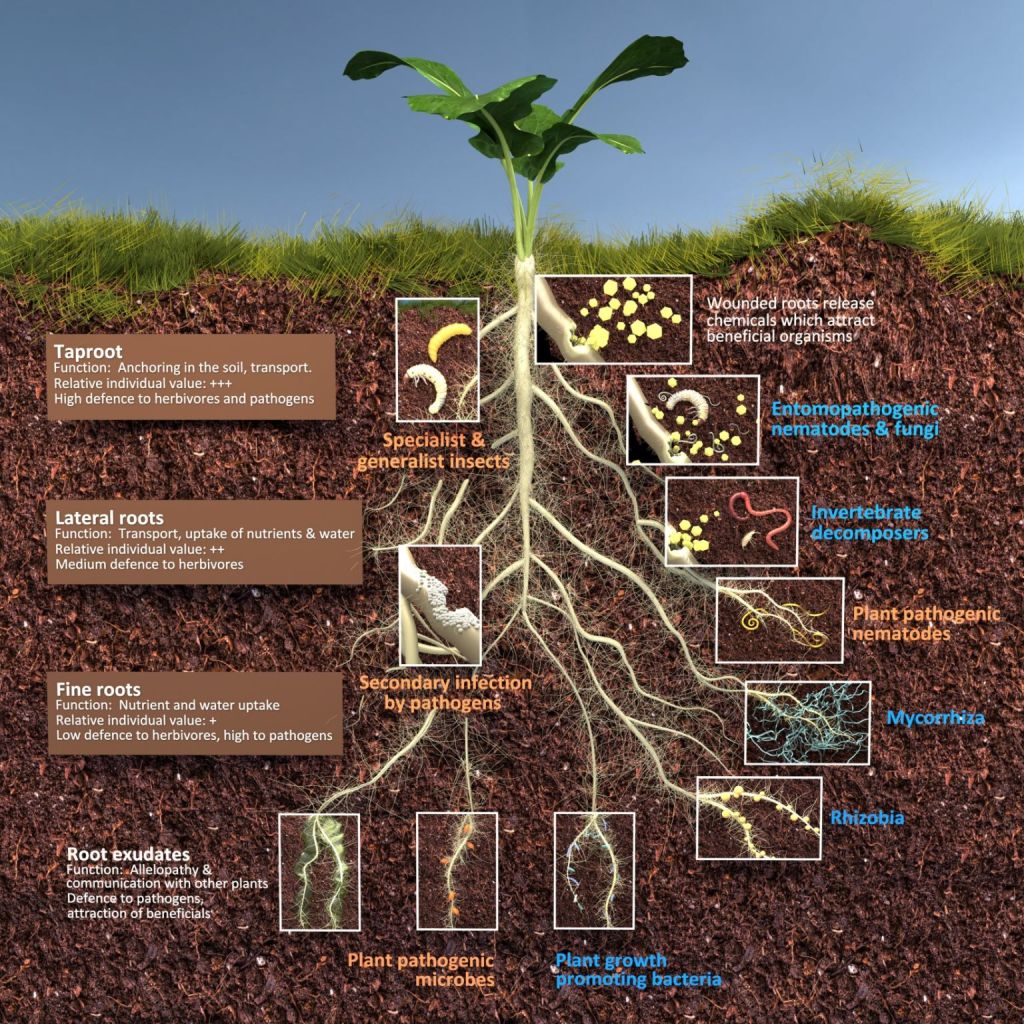
Enhancing Soil Microbiome Interactions
A healthy soil microbiome is vital for nutrient supply, disease resistance, and stress tolerance. Strategies to enhance this interaction include:
Selecting Microbiome-Friendly Varieties: Some plants are better at recruiting beneficial microbes. Selecting and breeding these varieties can enhance nutrient uptake and stress resilience. Knowing this may involve utilizing the “Haney Test” for measuring CO2 in soil to determine microbial activity and the PLFA test for knowing microbe diversity.
Soil Health Practices: Incorporating organic matter, reducing tillage, and using cover crops to support a diverse and active soil microbiome. Some varieties, especially open-pollinated varieties grown for multiple seasons in the same area become adapted to these practices.
Emphasis on Plant Root Interactions with Soil Microbiome
Understanding and Measurement: The ability of a plant to recruit and maintain a beneficial soil microbiome is pivotal for nutrient acquisition, disease suppression, and stress tolerance in organic systems. How do you know? These traits can be measured by some sophisticated tools:
Microbial Diversity and Abundance: Using DNA-based techniques (such as 16S and ITS rRNA gene sequencing) to identify and quantify the microbial communities associated with plant roots. This is how scientists are learning to characterize microbes specific to crops.
Plant Exudate Profile: Analyzing root exudates to understand the chemical compounds released by roots that attract beneficial microbes.
Microbial Activity: Measuring soil enzyme activities or microbial respiration rates as indicators of microbial activity and health around the root zone (Haney test and PLFA test).
Beneficial Associations: Quantifying specific beneficial associations, such as mycorrhizal colonization rates or the presence of nitrogen-fixing bacteria, through microscopy or molecular markers. (Some companies are now offering this service, but it is several $$ to use!)
Legal Considerations! Before you try being your own plant breeder be sure you know your seeds…..
Plant Variety Protection (PVP) Certificates
Plant Variety Protection (PVP) certificates are a form of intellectual property protection specifically designed for new varieties of seed- and tuber-propagated plants. Administered in the United States by the Plant Variety Protection Office (PVPO), part of the USDA, a PVP certificate grants breeders exclusive rights to their new plant varieties for a period of 20 years from the date of issuance (25 years for trees and vines). To qualify, a variety must be new, distinct, uniform, and stable.
One of the key features of the PVP system is the “farmer’s exemption,” which allows farmers to save seeds from PVP-protected plants for their own use in planting subsequent crops. However, they are not permitted to sell the saved seeds for planting purposes without the breeder’s permission. This exemption is crucial as it recognizes and preserves traditional farming practices while still providing incentives for breeders to develop new varieties.
Utility Patents
Utility patents, on the other hand, offer a broader scope of protection and can apply to any new and useful process, machine, manufacture, or composition of matter, or any new and useful improvement thereof. In the context of agriculture, utility patents can protect genetically modified organisms (GMOs), specific plant genes, methods of breeding, or methods of creating a plant with specific characteristics.
Utility patents on plants offer strong protection because they prevent others from making, using, selling, offering for sale, or importing the patented invention without authorization for up to 20 years from the filing date. Unlike PVP certificates, utility patents do not include a farmer’s exemption, meaning that even saving and replanting seeds from a patented plant can infringe on the patent holder’s rights.
Distinctions and Implications
The distinction between PVP and utility patents lies not only in the scope of what they protect but also in their implications for breeders, farmers, and the agricultural industry at large. PVP is specifically designed for plant varieties and includes provisions that balance the interests of breeders with traditional farming practices, such as seed saving. Utility patents provide a broader and stronger level of protection, including for biotechnological inventions, but also impose more stringent limitations on the use of patented materials.
Soil sampling is an essential practice in agriculture, providing a foundation for informed decision-making regarding soil management and crop production. The process involves collecting soil samples from multiple locations within a field to analyze for nutrient content, pH levels, organic matter, and other soil properties. This analysis offers a snapshot of the soil’s health and fertility, guiding farmers and agronomists in customizing fertilizer applications and other soil amendments to meet the specific needs of their crops. By tailoring these practices based on soil test results, producers can optimize plant growth, increase crop yields, and reduce the risk of over-application of fertilizers, thereby minimizing environmental impact.
The benefits of soil sampling extend beyond the immediate improvement of crop production. It plays a crucial role in sustainable agriculture by helping to maintain soil health over the long term. Healthy soil supports a diverse microbial ecosystem, improves water retention and drainage, and enhances the soil’s ability to store carbon, contributing to the mitigation of climate change. Moreover, by understanding the soil’s condition, farmers can adopt practices that prevent soil degradation, such as erosion and nutrient depletion, ensuring the land remains productive for future generations. Thus, regular soil sampling is a key tool in the pursuit of sustainable farming, enabling the efficient use of resources while protecting and enhancing the natural environment.
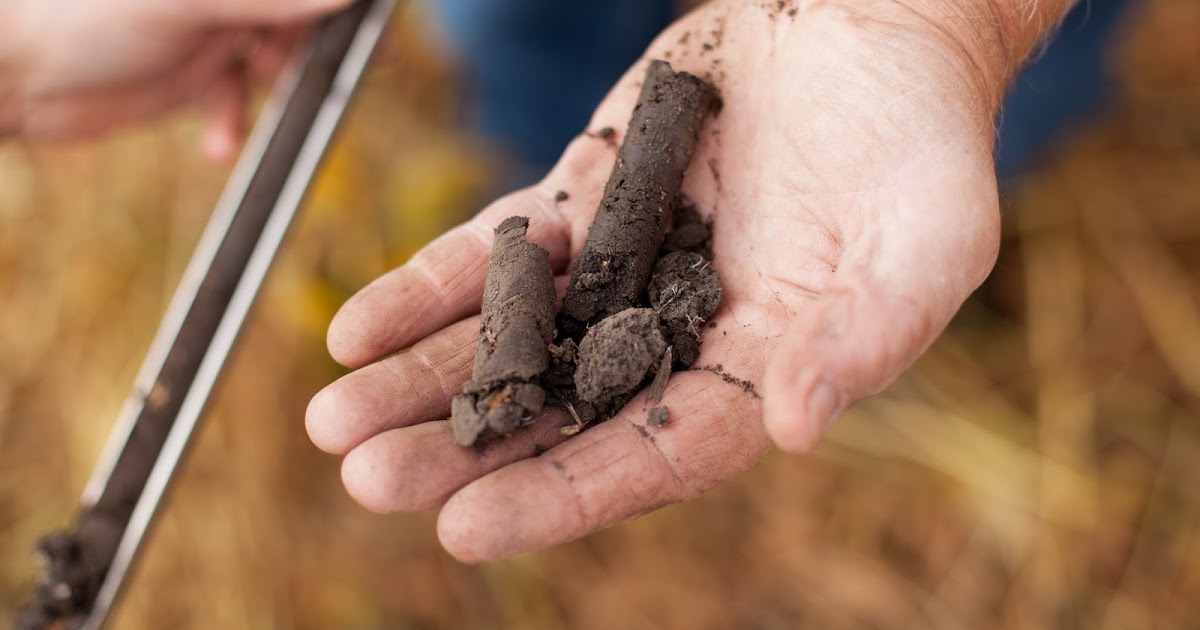
Taking a proper soil test involves a series of steps to ensure the accuracy of the soil sample, which in turn, provides reliable data for making informed agricultural decisions. Here is a detailed list of how to conduct a proper soil test:
Planning the Sampling Strategy: Determine the appropriate time and pattern for sampling. Ideally, soil should be sampled at the same time each year, avoiding periods immediately after fertilizer application. Divide the field into uniform areas based on soil type, topography, previous crop history, and apparent soil variability.
Gathering the Right Tools: Equip yourself with a clean, rust-free soil probe, auger, and/or shovel, and a plastic bucket. Avoid using metal containers which can contaminate the soil sample with trace metals.
Sampling Depth: Collect soil samples at a consistent depth. For annual crops, a depth of 6-8 inches is typical, whereas for perennials, samples may be taken from a deeper profile, depending on the root zone of the crop.
Collecting the Soil Sample: In each area, collect soil from at least 15-20 random spots to avoid bias. Mix these sub-samples in the plastic bucket to form a composite sample. This approach ensures the sample represents the overall area rather than specific spots.
Labeling and Documentation: Clearly label each sample with a unique identifier, noting the sampling date, location, depth, and any other relevant information. This step is crucial for keeping records and interpreting the results accurately.
Preparing the Sample for Analysis: Allow the soil to air-dry at room temperature; avoid heating or sun-drying as this can alter the soil chemistry. Once dry, remove stones, roots, and other debris, and break up clumps. A quart-sized sample is typically sufficient for laboratory analysis.
Choosing a Laboratory: Select a reputable soil testing laboratory that uses methods appropriate for your region’s soils. Provide the laboratory with detailed information about your crop, previous fertilizer applications, and any specific concerns you have.
Interpreting the Results: Once you receive the soil test report, review the recommendations on fertilization and soil amendment. If necessary, consult with an agronomist or extension specialist to understand the implications for your specific situation and crops.
Implementing Recommendations: Use the soil test results to adjust your fertilization strategy, applying nutrients according to the crop’s needs and the soil’s current status. This targeted approach helps avoid overuse of fertilizers, promoting environmental sustainability and economic efficiency.
Monitoring and Adjusting: Soil testing should be a regular part of your farm management practice. Re-test soils in each field every 2-3 years or more frequently if significant amendments have been made, to monitor changes in soil health and fertility over time.
Above is a standard soil probe that will last you for years – well worth the cost. Next is a picture of WD-40 which is a great spray for the probe to keep the soil from sticking in the probe. Clay soils can be difficult to get “out” but WD-40 eliminates the issue.
Following these steps ensures that the soil testing process is thorough, and the results are reliable, forming a solid basis for sustainable soil management and crop production strategies.
What does a soil test tell you about soil?
Soil testing encompasses a range of analyses that evaluate different aspects of soil health, soil properties, and soil fertility, providing critical information for agricultural management and environmental assessment. Here are several key types of soil tests commonly conducted:
pH Test: Measures the acidity or alkalinity of the soil on a scale from 1 to 14. Soil pH affects nutrient availability to plants and microbial activity in the soil. A pH of 7 is neutral, values below 7 are acidic, and values above 7 are alkaline.
Nutrient Content Test: Assesses the levels of essential nutrients, including nitrogen (N), phosphorus (P), potassium (K) (often referred to as NPK), calcium (Ca), magnesium (Mg), sulfur (S), and micronutrients like iron (Fe), manganese (Mn), copper (Cu), zinc (Zn), boron (B), molybdenum (Mo), and chlorine (Cl). This test helps in determining fertilizer needs.
Organic Matter Test: Evaluates the amount of organic matter in the soil, which influences water retention, nutrient availability, and soil structure. High organic matter content is beneficial for soil health and plant growth.
Soil Texture Test: Determines the proportions of sand, silt, and clay in the soil. Texture affects water retention, drainage, and nutrient availability, and it guides management practices such as irrigation and cultivation.
Cation Exchange Capacity (CEC) Test: Measures the soil’s ability to hold and exchange cations (positively charged ions) such as calcium, magnesium, and potassium. CEC is influenced by soil texture and organic matter content and affects soil fertility.
Electrical Conductivity (EC) Test: Assesses the soil’s electrical conductivity, which is an indicator of salinity levels. High salinity can affect plant growth by inhibiting water uptake.
Lime Requirement Test (Buffer pH Test): Determines the amount of lime needed to adjust the soil pH to a desirable level for crop production. This is crucial for acidic soils needing pH correction.
Soil Water Holding Capacity: Measures the amount of water the soil can hold and make available to plants. This is important for irrigation planning and drought management.
Soil Aggregate Stability: measure how well aggregates hold together during a disturbance event. These tests can predict soil risks or management needs and track changes to soil overtime. The SLAKES APP is a great tool that is easy to use on your smartphone.
Heavy Metal Test: Identifies the presence and concentration of heavy metals such as lead (Pb), arsenic (As), cadmium (Cd), and mercury (Hg), which can be toxic to plants and humans at high levels.
Soil Health Tests: These are comprehensive tests that may include biological indicators such as microbial biomass, enzyme activities, and earthworm counts, assessing the overall health and biodiversity of the soil.
Soil Tests Typically Taken
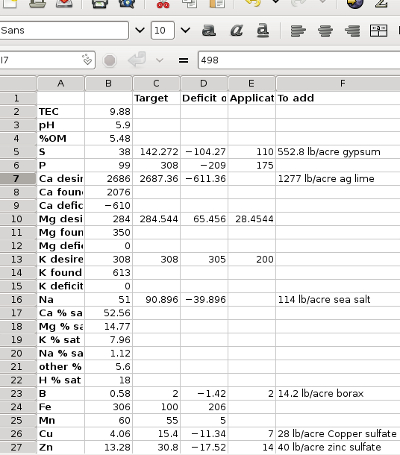
Of course, a normal soil test or what you might call a Regular Soil Test discussed above is a must. These are not usually expensive, +/- $15 or more with micronutrients. This test is mostly meaningless unless I have previous year’s results to see what is going on. I have taken literally thousands of soil samples and often I will see something show up that is off the charts. I am not known to panic when I see a problem because I am not going to react to that test unless I know it has steadily been a problem that is just getting worse. For instance, we can see pH swings in sand from one year to the next. Before I lime a soil, I may take a second sample just to verify I need lime. $15 soil test is cheaper than $60 per acre lime application.
Second, I like to have a Haney Soil Testdone to get an idea of the availability of many nutrients in an organic system and to better understand the overall “healthiness” of the soil. It is not cheap compared to the typical soil test. Most labs charge $50 so you don’t usually just send everything in for a Haney Test. Again, the results are only good if you have several years’ worth of data to see if you are getting better.
Next, is the Soil Wet Aggregate Stability Test. This test used to assess the ability of soil aggregates to resist disintegration when exposed to water.
Last, is the PLFA Test or Phospholipid Fatty Acid Test. This test measures the biomass of the microbes in the soil and is one of the tests that is currently being conducted to determine the microbial population of soil. See down below for more.
This is an example of soil test costs from one lab. They are all about the same price from multiple labs.
Haney Soil Health Test
The Haney Soil Health Test is a comprehensive analysis designed to evaluate the overall health and fertility of the soil through a holistic approach. Developed by Dr. Rick Haney, a research soil scientist with the USDA, this test goes beyond conventional chemical nutrient analysis by incorporating measurements of soil organic matter, microbial activity, and the potential for nitrogen and phosphorus mineralization. The test employs a unique set of assays, including the Solvita CO2-Burst test, which measures the amount of carbon dioxide released from the soil after rewetting dry soil to assess microbial respiration and activity. This is an indicator of the soil’s biological health and its ability to cycle nutrients.
Additionally, the Haney Test evaluates the water extractable organic carbon (WEOC) and water extractable organic nitrogen (WEON), which are believed to more accurately reflect the pool of nutrients that are readily available to plants than traditional extraction methods. By assessing both the chemical and biological fertility of the soil, the Haney Test provides a more integrated view of soil health, guiding farmers in optimizing their management practices to support sustainable agriculture. The results from the Haney Test can help in making more informed decisions on the application of fertilizers and amendments, aiming to enhance soil health, reduce environmental impact, and improve crop yields by fostering a more vibrant and resilient soil ecosystem. This test is particularly valuable for those engaged in regenerative agriculture and organic farming, as it aligns with the principles of nurturing soil life and function to achieve productive and sustainable farming systems.
The Haney Soil Health Test provides a comprehensive set of results that offer insights into both the chemical and biological aspects of soil health. The test results typically include several key indicators:
Soil Health Score: A composite index that reflects the overall health of the soil, integrating various test components to give a summary assessment. This score helps in comparing the health of different soils or the same soil over time.
Water Extractable Organic Carbon (WEOC): Measures the amount of organic carbon that is easily available in soil water, indicating the potential food source for microbes.
Water Extractable Organic Nitrogen (WEON): Indicates the level of organic nitrogen available in soil water, which can be readily used by plants and soil organisms.
CO2-C Burst (Carbon Mineralization): Assesses microbial respiration by measuring the burst of carbon dioxide released from the soil after it is moistened, indicating active microbial biomass and soil organic matter decomposition rate. This number will be between a low of <10 and a very high score is >200. This will be in parts per million or mg/kg which is the same.
Soil pH: The acidity or alkalinity of the soil, which affects nutrient availability and microbial activity.
Electrical Conductivity (EC): A measure of the soil’s electrical conductivity, which can indicate salinity levels that might affect plant growth.
Extractable Phosphorus, Potassium, Magnesium, Calcium, and other nutrients: Provides information on the levels of these essential nutrients that are available for plant uptake, based on water extractable methods.
Nitrate-Nitrogen and Ammonium-Nitrogen: Measures the inorganic forms of nitrogen available in the soil, which are directly usable by plants.
Cation Exchange Capacity (CEC): Indicates the soil’s ability to hold and exchange cations (positively charged ions) important for plant nutrition.
Organic Matter %: The percentage of soil composed of decomposed plant and animal residues, indicating the potential of soil to retain moisture and nutrients.
Recommendations for Fertilizer and Lime Applications: Based on the test results, specific recommendations are made to address nutrient deficiencies or pH imbalances, tailored to the crop being grown and the goals of the farmer.
These results (see below for a sample) offer a detailed picture of the soil’s current condition, highlighting areas where improvements can be made to enhance soil health, fertility, and productivity. By focusing on both the biological and chemical facets of soil health, the Haney Test guides farmers towards more sustainable and efficient management practices, emphasizing the importance of soil life in agricultural ecosystems.
Soil Wet Aggregate Stability Test
Soil wet aggregate stability testing is a method used to assess the ability of soil aggregates to resist disintegration when exposed to water. This test is crucial for understanding soil structure, which plays a vital role in the soil’s ability to support plant growth. In this method, soil aggregates are placed on a sieve and submerged in water, where they are subjected to gentle agitation to simulate natural conditions such as rainfall. The stability of these aggregates is then measured by determining how much of the soil remains intact after exposure to water. The results provide valuable insights into the soil’s resistance to erosion, its ability to retain water, and its overall structural integrity.
The importance of wet aggregate stability testing lies in its direct relationship to soil health and crop productivity. Stable aggregates improve water infiltration and retention, reducing the risk of surface runoff and erosion, which can lead to nutrient loss and reduced soil fertility. Additionally, well-structured soils with high aggregate stability allow roots to penetrate more easily, access nutrients, and withstand environmental stresses such as drought. For growers, maintaining high aggregate stability is essential for sustaining healthy crops and promoting long-term soil fertility, making this test a critical component of comprehensive soil health assessments.
The four methods you can use for measuring soil aggregate stability include: Slaking image analysis, Cornell Rainfall Simulator, Wet Sieve Procedure, Mean Weight Diameter
Slaking Image Analysis:
Overview: This method uses a smartphone app, like SLAKES, to capture and analyze images of soil aggregates submerged in water. The app tracks the degree to which the aggregates break apart (slake) over time. (easy to download to your smartphone and I can even use it!)
Why It’s Used: It offers a quick, accessible way to assess aggregate stability in the field without the need for specialized lab equipment. For farmers, this method is very easy and practical to use, making it ideal for routine soil health monitoring, though it may lack the precision needed for scientific research.
Overview: Soil aggregates are placed under a simulated rainfall, and the test measures how well the soil resists breaking apart and eroding. The simulator mimics natural rainfall to assess the soil’s response.
Why It’s Used: This method is particularly useful for understanding soil erosion potential and how soil structure withstands actual rainfall events. For farmers, it provides insights into how well their soil can handle heavy rains, though it typically requires access to specialized equipment only available at a few labs.
Wet Sieve Procedure:
Overview: In this method, soil aggregates are placed on a series of sieves and submerged in water. The sieves are then mechanically agitated to simulate natural conditions like water flow. The amount of soil that remains on the sieves is measured to determine stability.
Why It’s Used: It is a widely recognized and precise laboratory method for quantifying the stability of soil aggregates under wet conditions. Farmers might find this method less accessible due to its complexity, but it provides highly reliable data that can inform long-term soil management decisions. Typically used by researchers.
Mean Weight Diameter (MWD):
Overview: This method calculates the average size of soil aggregates that remain stable after being subjected to wet sieving. It provides a single value that reflects the overall stability of the soil.
Why It’s Used: MWD is a commonly used metric in soil science because it offers a straightforward way to compare the stability of different soils and management practices. For farmers, this method can be useful for tracking the impact of different practices on soil structure over time, though it’s usually conducted in a lab setting.
Using the PLFA Soil Health Test
The Phospholipid Fatty Acid (PLFA) analysis is a powerful tool for assessing soil health, focusing on the microbial community within the soil. Phospholipid fatty acids are components of cell membranes in all living organisms, and their presence and composition in soil samples can provide detailed information about the microbial community structure, including bacteria, fungi, actinomycetes, and other soil organisms.
How the PLFA Test Works
The PLFA test involves extracting phospholipids from a soil sample and then analyzing the fatty acid components. Each group of microorganisms has a unique fatty acid profile, allowing scientists to identify and quantify the types of microbes present in the soil. This information can be used to assess biodiversity, microbial biomass, and the balance of fungal to bacterial communities, which are critical indicators of soil health and ecosystem function.
Importance of PLFA Analysis for Soil Health
Microbial Biomass: The total amount of microbial biomass is a direct indicator of soil organic matter decomposition and nutrient cycling capabilities. High microbial biomass often correlates with healthy, fertile soil.
Community Composition: The composition of the microbial community can indicate the soil’s condition and its ability to support plant growth. For example, a higher fungal to bacterial ratio is often found in soils with good structure and organic matter content.
Soil Stress and Disturbance: Changes in microbial community composition can also indicate soil stress, contamination, or the impact of agricultural practices such as tillage, crop rotation, and the use of fertilizers or pesticides.
Baseline and Monitoring: Establishing a baseline microbial community profile allows for the monitoring of changes over time, assessing the impact of management practices on soil health.
Applications of PLFA Analysis
Agricultural Management: Helping farmers and agronomists understand the impact of farming practices on soil microbial communities and, by extension, soil health and crop productivity.
Environmental Assessment: Evaluating the restoration of soil ecosystems following contamination or disturbance.
Research: Advancing our understanding of soil microbial ecology and its relationship to plant health, climate change, and ecosystem services.
Advantages and Limitations
The PLFA test offers a direct, rapid assessment of living microbial biomass and community structure, providing valuable insights into soil health that are not captured by chemical soil tests alone. However, it requires specialized equipment and expertise to perform and interpret, and the cost may be higher than traditional soil tests. Despite these limitations, the PLFA analysis remains a critical tool for comprehensive soil health assessment, guiding sustainable soil management and conservation efforts.
Great publication you can read on understanding these Soil Health Tests. Just click the link below:
The “take home” message is not soil testing only, but records of soil tests you can see over time!
Trace Genomics Testing
Thanks to Dr. Justin Tuggle for sending this information to me about Trace Genomics. This is a fairly new company that basically tells you what kinds of microbes you have in the soil, good or bad, to then help make decisions of what you need to do. It may be a new variety, a biostimulant or a soil treatment. I would like to see some producers try this new test and share some examples of what it can do. Click here to see their webpage.
A quote from Trace Genomics
“We engage in hi-definition DNA sequencing down to the functional gene level. This lets us mine the soil microbiome to identify specific functions, commonly referred to as “indicators,” which can provide actionable insights to help you maximize soil health. One example is a phosphorus solubilization indicator, which analyzes the quantified capability of microbes in the soil to release bound phosphate and make it plant available.”
“In just one soil test you get insights covering more than 70 crops and more than 225+ pathogens. TraceCOMPLETE pairs unmatched soil analysis with hi-definition genomic sequencing to deliver an unrivaled collection of pathogen and nutrient insights. It can drive agronomic action in your most critical decision areas to help you make meaningful management decisions.“
Soil Labs: this is not a complete list by any means but simply a guide.
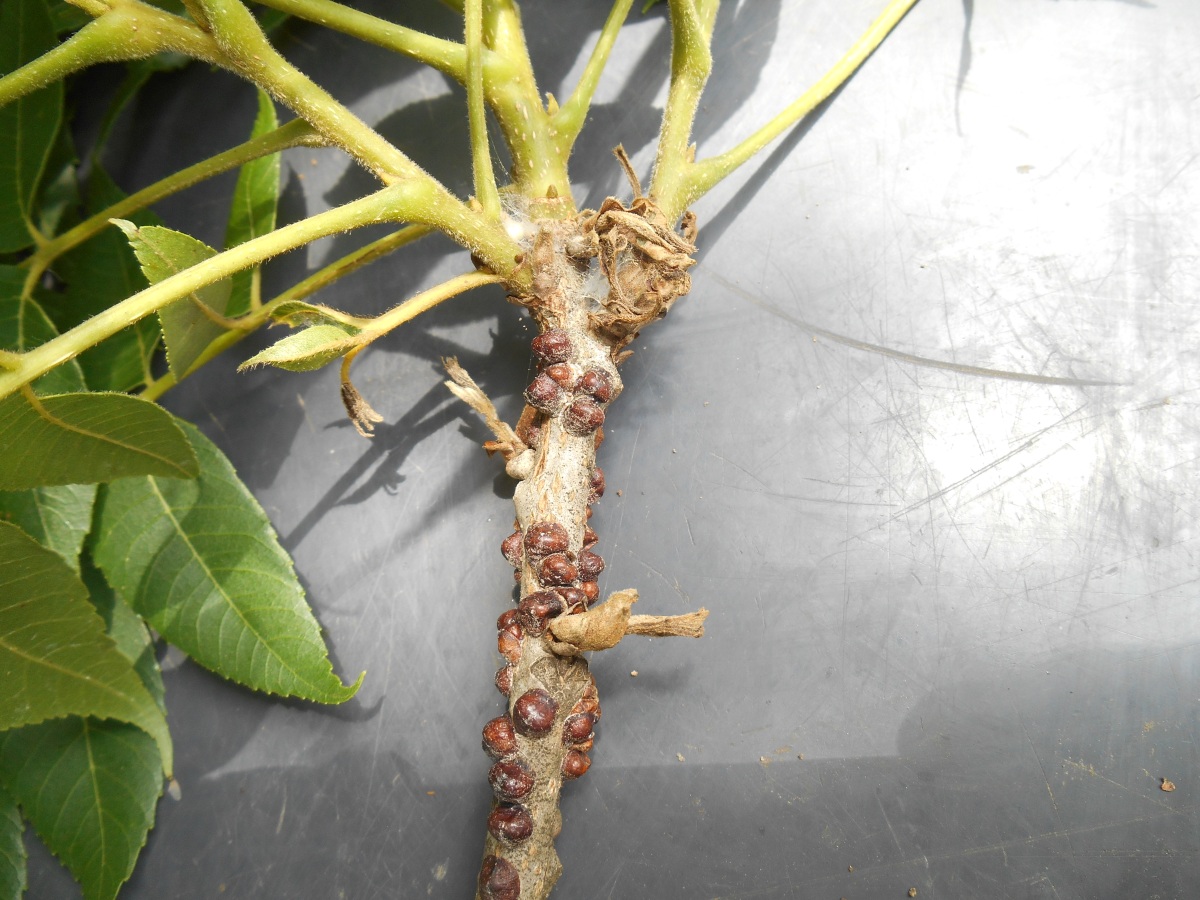
Scales are sucking insects that insert their tiny, straw-like mouthparts into bark, fruit, or leaves, mostly on trees and shrubs and other perennial plants. Some scales can seriously damage their host, while other species do no apparent damage to plants even when scales are very abundant. The presence of scales can be easily overlooked, in part because they do not resemble most other insects.
Lecanium scales in the picture above (there are about 12 species) are known as “soft” scales and are common pests on many ornamental plants all over North America. Holly, elm, redbud, walnut, citrus, apricot, pear, persimmon, beech, box elder, grape, pecan, rose, and willow are a sample of the diverse range of hosts that Lecanium scales can parasitize.
As these scales feed, they excrete large quantities of honeydew which serves as a substrate for sooty mold fungi.
Here is a link to a previous post I wrote about this scale on pecan. Scale on Pecan?
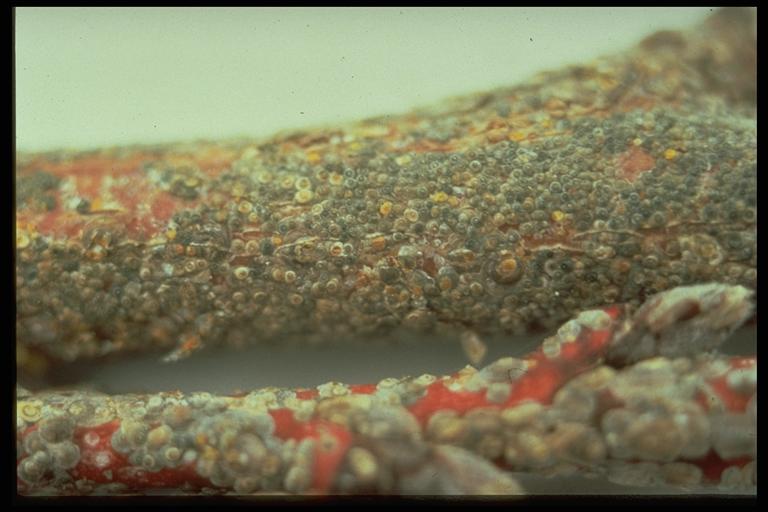
San Jose Bark Scale
San Jose scale, Quadraspidiotus perniciosus (Comstock) (Homoptera: Diaspididae). Photo by C. L. Cole.
San Jose Bark Scale is one of the major insect pests of peaches and maybe one that causes the most damage. The first signs of infestation include a decline of tree vigor, leaf drop and appearance of sparse yellow foliage, particularly on the terminal growth. Reddish spots on the underside of bark and around scales on leaves or fruit result from feeding of immature stages. In severe cases, the entire surface of bark can become covered with layers of overlapping grayish scales. Cracking and bleeding of limbs occur, and heavily injured trees may die.
Life Cycle: Intermediate. Mature females and immature (second nymphal instar) stages survive the winter. Rather than eggs, female scale insects produce tiny six-legged, mobile, yellow-colored young, called “crawlers.” This stage spreads the infestation to new areas on the host plant, including bark, leaves and fruit, and to new hosts. After inserting their thread-like mouthparts into the plant and feeding for 2 to 3 days, female crawlers secrete their initial scale coverings and never move from that spot. Males develop into 2-winged adults in 2 or 3 weeks and emerge from their scales to seek females to mate. Up to six generations may be produced annually. All stages of development can occur throughout the year except during the winter.
Crape Myrtle Bark Scale
The crape myrtle bark scale, Acanthococcus (Eriococcus) lagerstromiae (Kuwana) was first confirmed in the USA in 2004 in the landscape near Dallas (TX), although it was likely introduced earlier. The scale is a sucking insect that feeds on the phloem (sap) of plants. As it feeds, it excretes a sugary solution known as “honeydew” (similar to aphids, whiteflies, and other sucking insects). Heavy infestations of crape myrtle bark scale produce sufficient honeydew to coat leaves, stems and bark of the tree. This honeydew, in turn, will eventually turn black as it is colonized by a concoction of fungi, called sooty mold. Although crape myrtles rarely die as a result of crape myrtle bark scale infestation, the sticky leaves and black trunks greatly reduce the attractive appearance of the tree.
Photo by Erfan K. Vafaie, Texas A&M AgriLife Extension.
Immature crape myrtle bark scale is hard to see with the naked eye, but adult scale covers, and egg sacs are frequently visible on the upper branches and trunk of the tree. These scales include larger, white, oval (female) and smaller, elongate (male) scales. Both male and female scales of the crape myrtle bark scale are immobile and will “bleed” pink blood when crushed.
On a personal note, this is a problem I have in my landscape and use Certis Biologicals – Des-X Insecticidal Soap as a treatment. Seems to work well but it does require repeat applications.
Mealybugs are prominent now in Greenhouses and Houseplants
Mealybugs are soft-bodied, wingless insects belonging to the family Pseudococcidae. These pests are known for their damaging effects on a wide range of plants, including crops, ornamentals, and houseplants. Their appearance is distinctive: adults are covered with a white, waxy, cotton-like secretion, making them resemble small tufts of cotton. This protective coating helps conserve moisture and offers some defense against predators and pesticides. Understanding the biology of mealybugs is crucial for developing effective management strategies in agricultural and horticultural systems.
Mealybugs have a complex life cycle that includes egg, nymph (crawler), and adult stages:
Egg: Female mealybugs lay hundreds of eggs within an ovisac, a protective sac made from waxy secretions. The color and size of the ovisac can vary among species.
Nymph (Crawler): After hatching, the nymphs, or crawlers, emerge to find feeding sites. This is the most mobile stage of the mealybug life cycle, and it’s when they are most vulnerable to control measures. Crawlers are tiny, yellowish, and lack the waxy coating seen in adults.
Adult: As they mature, nymphs undergo several molts before reaching adulthood. Adult females are larger than males and retain the waxy coating. Males may develop wings, depending on the species, and do not feed on plant sap as adults.
Mealybugs feed by inserting their long, slender mouthparts into plant tissues and sucking out sap. This feeding behavior can weaken plants, reduce growth, and cause leaf yellowing, wilting, and even death in severe infestations. As they feed, mealybugs excrete honeydew, a sticky substance that can lead to the growth of sooty mold, further impairing photosynthesis and plant health.
Mealybug reproduction can be sexual or asexual, varying by species. Some species are capable of parthenogenesis, where females produce offspring without mating. This ability allows for rapid population increases under favorable conditions.
Mealybugs spread primarily through human activity, such as the movement of infested plant material, and natural means, like crawling to adjacent plants or being carried by wind, animals, or ants. Ants, in particular, are known to farm mealybugs for their honeydew, protecting them from natural enemies and inadvertently aiding in their dispersal.
Introduction of Natural Predators or Disease
Controlling scale or mealybug insects in an organic farming system emphasizes the integration of biological and ecological methods to maintain pest populations below damaging levels. Biological control, one of the cornerstone practices in organic agriculture, involves the use of living organisms—predators, parasitoids, and pathogens—to regulate pest populations. Here are some effective methods to manage these insects through biological or predator-based strategies:
Lady Beetles (Coccinellidae): Many lady beetle species are voracious predators of scale insects in their larval and adult stages. For instance, the vedalia beetle (Rodolia cardinalis) has been successfully used to control cottony cushion scale in citrus groves.
Cryptolaemus montrouzieri: Often referred to as the mealybug ladybird, this beetle is a voracious predator of mealybugs in both its larval and adult stages. It has been used successfully in various agricultural systems to control mealybug populations.
Lacewings (Chrysopidae): Green and brown lacewings consume scale insects during their larval stages. Green lacewing larvae are effective predators of mealybugs, consuming them at various stages of their development. Their larvae are known as “aphid lions” for their predatory efficiency.
Parasitic Wasps: Tiny wasps, such as Aphytis melinus and Encarsia spp., specialize in parasitizing scale insects. They lay their eggs in or on the scale insect, and the developing larvae consume the scale from the inside. Several species of parasitic wasps, such as Leptomastix dactylopii, target mealybugs specifically. These wasps lay their eggs in or on mealybug larvae, and the hatching wasps consume the mealybugs from the inside.
Beauveria bassiana and Metarhizium anisopliae are fungi that infect and kill a wide range of insect pests, including scale and mealybug insects. These fungi are particularly useful in humid environments where they can naturally proliferate and infect scale populations.
Isaria fumosorosea (formerly known as Paecilomyces fumosoroseus) is a naturally occurring entomopathogenic fungus that acts as a biological control agent against a wide range of insect pests, including mealybugs, aphids, whiteflies, thrips, and other soft-bodied insects. It infects its hosts through the cuticle, leading to the pest’s death, and is particularly useful in integrated pest management (IPM) systems in organic agriculture and greenhouse settings.
Below you will see a list of organic products that have scale and/or mealybugs on their labels. These include some of the beneficial fungi listed above as well as botanical oils and the still very popular Azadirachtin extracted from the neem tree. You can just look through this short list or click on the link below to either see it on your computer or download and use as an Excel file.
This is a picture of the “Purple Tomato” developed and sold by Norfolk Healthy Produce. According to the press release from the John Innes Centre it is a high-anthocyanin purple tomato developed nearly 2 decades ago. Here are a couple of paragraphs from the article below.
Nathan Pumplin, CEO of Norfolk Healthy Produce, said: “We are thrilled to offer these first-of-a-kind seeds to home gardeners. Our tomato is just a tomato – you can grow it in your garden next to your Sun Golds and Purple Cherokees, and other favorite varieties. We share our gratitude to the thousands of fans who have expressed their interest and encouragement through our website.”
The company says that surveys with American consumers showed that 80% are interested to eat, purchase and grow the purple tomato, knowing that it is bioengineered (as a genetically modified organism, or GMO). Only 5% of consumers were not interested. I seriously doubt this last sentence and wonder how accurately they surveyed customers!
These pictures are of the YOOM tomato. This purple tomato was introduced last year and as you can see also has the purple color and because of that color it has high anthocyanins like other purple vegetables and fruit.
The Yoom tomato is not developed using GMO technology like the “Purple Tomato.” Instead, Yoom tomatoes are the result of conventional breeding techniques. These techniques involve selecting parent plants with desirable traits and crossbreeding them over multiple generations to produce offspring that express those traits. The Yoom tomato, known for its distinctive purple color and high levels of antioxidants, particularly anthocyanins, was developed through this traditional method of plant breeding.(Article in Vegetable Grower News)
The purple color is a natural trait that some tomato varieties exhibit, enhanced through the selection process to appeal to consumers looking for novel and potentially healthier options in their diets. The development of such varieties focuses on enhancing flavor, nutritional content, and visual appeal without the need for genetic modification techniques like CRISPR-Cas9 or GMO.
Conventional breeding remains a powerful tool in developing new plant varieties, allowing for the gradual improvement of crops with respect to taste, yield, disease resistance, and nutritional content. While CRISPR technology offers precise gene editing capabilities, it’s important to distinguish between crops developed through genetic modification and those, like the Yoom tomato, that are the result of selective breeding practices.
Organic growers need to be aware of this powerful difference and don’t be fooled by others who want you to grow the Purple Tomato without realizing the difference. Recently I was asked about organic farmers growing the Purple Tomato. I was caught completely unaware because I knew about YOOM and so thought this was the tomato they were referring to. It was not the YOOM, and you need to know it is not legal or ethical for you to grow the “Purple Tomato” unless you grow the YOOM Purple Tomato.
Lastly, YOOM is not a certified organic seedvariety (YET), at least that I can find. There may be some organic seed offered soon but you will need to talk to your certifier about using conventional YOOM seed based on the fact that it is from conventional breeding and is the only tomato variety with these traits.
News Updates below: Click links for a new twist to this story!
Plant breeders and seed retailers are increasingly living in fear of legal threats from GMO developer companies. Report: Claire Robinson
The company that is commercializing the GM purple so-called “anti-cancer” tomato has targeted a non-GMO heirloom seed company over alleged patent infringement.
(Click the heading above for a link to this article)